 |
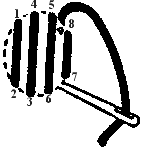
Laid work When a design area is to be filled with extra-long stitches, the over-and-under motion of the satin stitch becomes impractical. Instead, the threads are laid on the surface of the fabric. Come up ant o1, bring thread across to 2, then from 3 to 4, and so on. Leave just enough space between threads to accommodate one single thread on the return row, as indicated in the diagram. It is possible to make the stitches close enough to cover in one row, but I prefer this method, especially when the stitches are very long or the fabric is lightweight. Laid work must be placed on a stretcher or a hoop. If the design area is of an irregular shape, place your first thread across its widest part and work the rest parallel to it above and below. Long stitches should be held down and various stitches may be used for this. If the laid threads are silk and the overembroidery is gold or silver or contrasting silk colors, the effect is elegant. |
 |
Running Stitch Bring needle over and under the fabric to create a row of evenly spaced stitches on both the surface and the underside. The top stitches may be a different size from those on the underside. This is the simplest of needlework. It is used as a basting stitch as well as in decorative outlines. A smaller, tighter version is the quilting stitch. Double running stitch is achieved when, on the return row, the running stitch is worked in reverse, covering all the spaces. The effect is that of a backstitch except that both sides of the work look the same. Work from right to left. |
 |
Stem Stitch Work from left to right along the design outline. Stitch are slightly slanted and of equal size. Practice the stem stitch on a variety of drawn outlines and learn to curve it gracefully. It is very useful in fine-line stitchery. |
 |
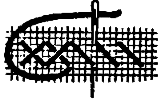
Cross Stitch Always worked on counted-thread fabric or canvas mesh. Two slanted stitches of equal length cross each other. The stitches may be worked from right to left or top to bottom one at a time; or work a line of half-crosses and finish the other half on the return row, as indicated in the diagram. The top stitches must always slant in the same direction on a given work. |
 |
Chain Stitch Work from left to right or top to bottom. Bring needle out and loop thread under its point. Pull needle gently to form a rounded loop stitch. Repeat by inserting needle in the same spot where the thread came out inside the previous loop. Chain stitch may be used as outline where a bolder, heavier line is desired. It may also be used as fill; begin in the center and work in pinwheel fashion, or work several rows side by side and in the same direction. Practice chain stitch if you are not familiar with it since it looks best when the loops are rounded and very even. |
 |
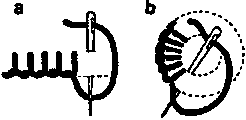
Buttonhole Stitch Bring the needle out on the lower line to the left of the work. Insert the needle in the upper line and take a straight stitch downward. Hold thread with left thumb and guide the needle over it and repeat. When the stitches are worked very close you have a button hole stitch. When they are worked wide apart you have a blanket stitch. Button hole stitch is durable and may be worked around eyelet holes instead of overcastting. |
 |
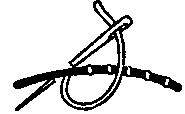
Couching Place a heavy thread along the design outline and "tie" it down with small stitches at regular intervals in a finer thread. The heavy thread is inserted through the fabric with another needle. If it is too heavy, or it is metallic cord, use an embroidery stiletto to punch a hole in the fabric at the beginning and at the end of the couching outline. I might add that stiletto does not break the fabric; it separates the fabric threads to accommodate the heavier thread. It is not necessary to knot or fasten the heavy guide thread in couching since it is kept in place by the small stitches. When couching stitches are slanted, they are referred to as Rumanian couching. Always work them in the same direction and keep them equidistant. |
 |
Satin Stitch A very popular embroidery stitch that may be worked straight or slanted. Stitches should be smooth with an even outline and should cover an area completely. If fabric shows in spots, add another stitch or two. Satin stitch requires practice. |
| Illustrations: : Silverstein, Mira. International Needlework Designs. Charles Scribner's Sons, 1978. | |